

1102 字
6 分钟
基于Hypermesh平台批量添加线性插值气动工况
1.引言
气动载荷很难给出所有位置的详细气动数据,一般情况下会给出特定点位下的气动值,同时气动载荷一般是均匀进行加载的,Hypermesh基于这种特性有线性插值的气动载荷 加载方式,在工程实践中经常遇到很多气动工况的加载,通过TCL代码实现批量气动载荷的加载。
2.Hypermesh线性插值介绍
Hypermesh线性插值主要有两种方式
1. 已有的气动值进行插值;(本文不做讨论)
2. 通过文件进行插值,文件要求参考帮助文档,数据样式为(X,Y,Z,preasure)。

3.多工况数据加载
3.1 多工况数据样式
一般保证X,Y,Z坐标值不变,不同的工况Preasure值变化,数据样式为:
(X,Y,Z,preasure1,preasure2,preasure3…)
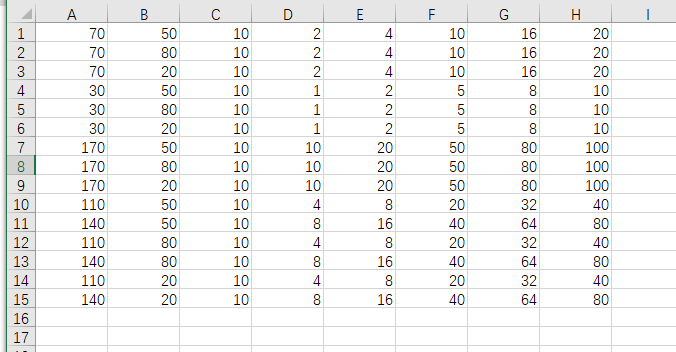
3.2 数据分列
Hypemesh每个工况读取一个线性插值文件,将多工况数据分列成多个线性插值文件。其原理为tcl读取excel文件,将文件按照列输出得到分开的加载文件。
#多工况线性插值#载荷文件格式.csv,每个值以","分隔,以"/n"换行#第一列X坐标,第二列Y坐标,第三列Z坐标,第四列及以后为各个工况的载荷值,并且每一列对应一个工况tk_messageBox -message "开始多工况线性插值-每个工况生成一个CSV文件"#选择结果文件保存路径,并设置为全局变量set ::ResultDirectoryFilePath [tk_chooseDirectory -title "选择结果文件保存路径"]set file [tk_getOpenFile -title "选择工况文件excel文件" ]set load_data [open "$file" r]while {![eof $load_data]} { #gets 一行数据,遇到换行符停止 gets $load_data load_data_line_all set line_load [split $load_data_line_all ","] set line_x [lindex $line_load 0] set line_y [lindex $line_load 1] set line_z [lindex $line_load 2] set m [llength $line_load] if {!($line_x eq "")} { for {set i 1} {$i <= $m - 3 } {incr i} { #a+一直打开这个文件,追加写入 set aload_case [open "$::ResultDirectoryFilePath/case_$i.txt" a+] set line3 [lindex $line_load [expr $i+2]] #puts 写文件会自动添加换行符 puts $aload_case "$line_x,$line_y,$line_z,$line3" flush $aload_case close $aload_case } } else { continue } }close $load_datatk_messageBox -message "完成load文件生成多个txt文件"3.3 气动加载
根据生成的载荷文件,选择对应的加载参数进行加载,参考帮助文档中*BCM进行加载设置
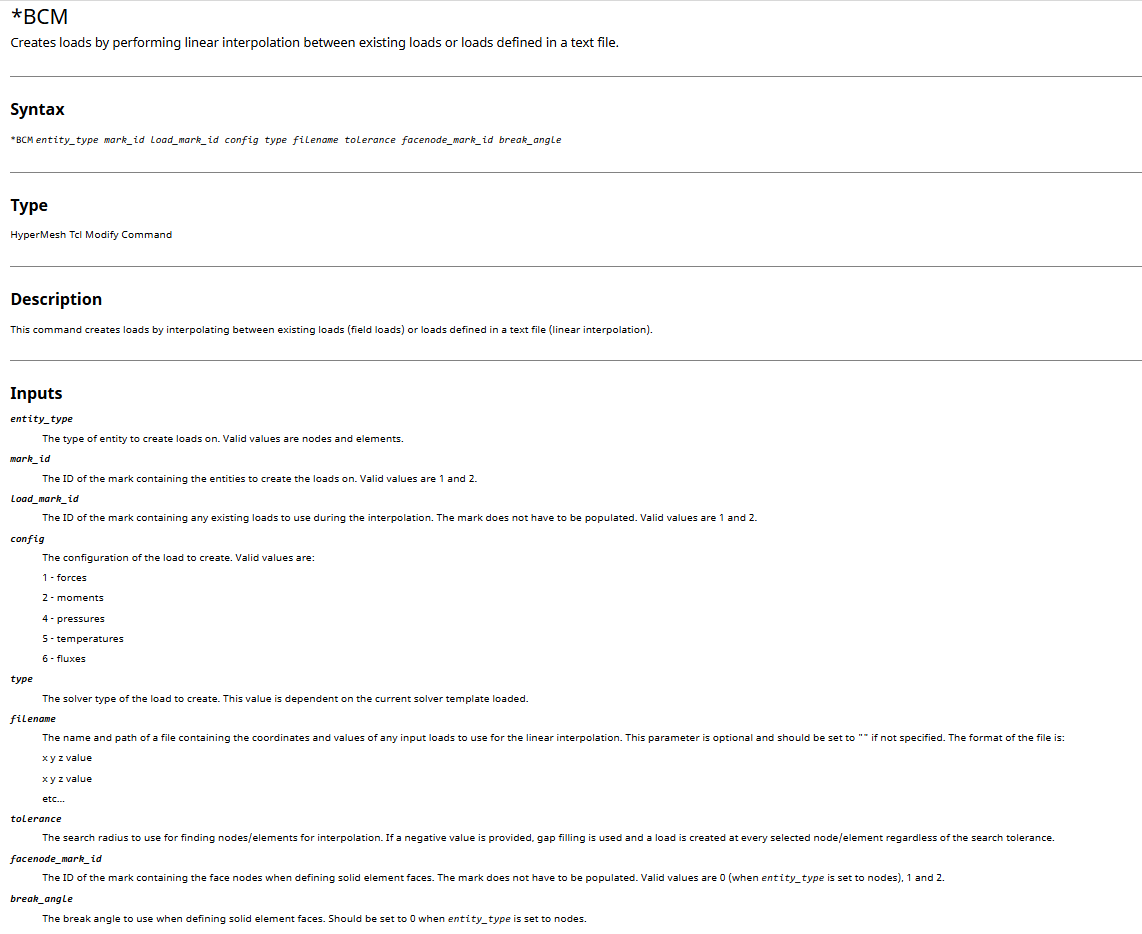
proc start_interpolation {loadstepName loadstepID} { eval set txt_num [llength [glob -nocomplain -directory $::ResultDirectoryFilePath *.txt]] for {set i 1 } {$i <= $txt_num } {incr i} { #加载单元,加载方向为单元法向,可以通过createmark的方式改变加载单元集合 *createmark elements 1 "displayed" #线性插值依赖已经存在的load和载荷点位,需要空的load *createmark loads 2 *createentity loadcols id=[expr $i + $loadstepID] name=[concat $loadstepName 1.0_ $i] #hypermesh中fill gap关掉,才能输入负值,当为负值时,所有单元都要进行插值(包括载荷点外的所有单元) *BCM elements 1 2 4 1 "$::ResultDirectoryFilePath/case_$i.txt" -50 1 30 *createmark loads 1 all *hideentitybymark loads 1 } tk_messageBox -message "完成多工况线性插值"}4.Tcl页面设置
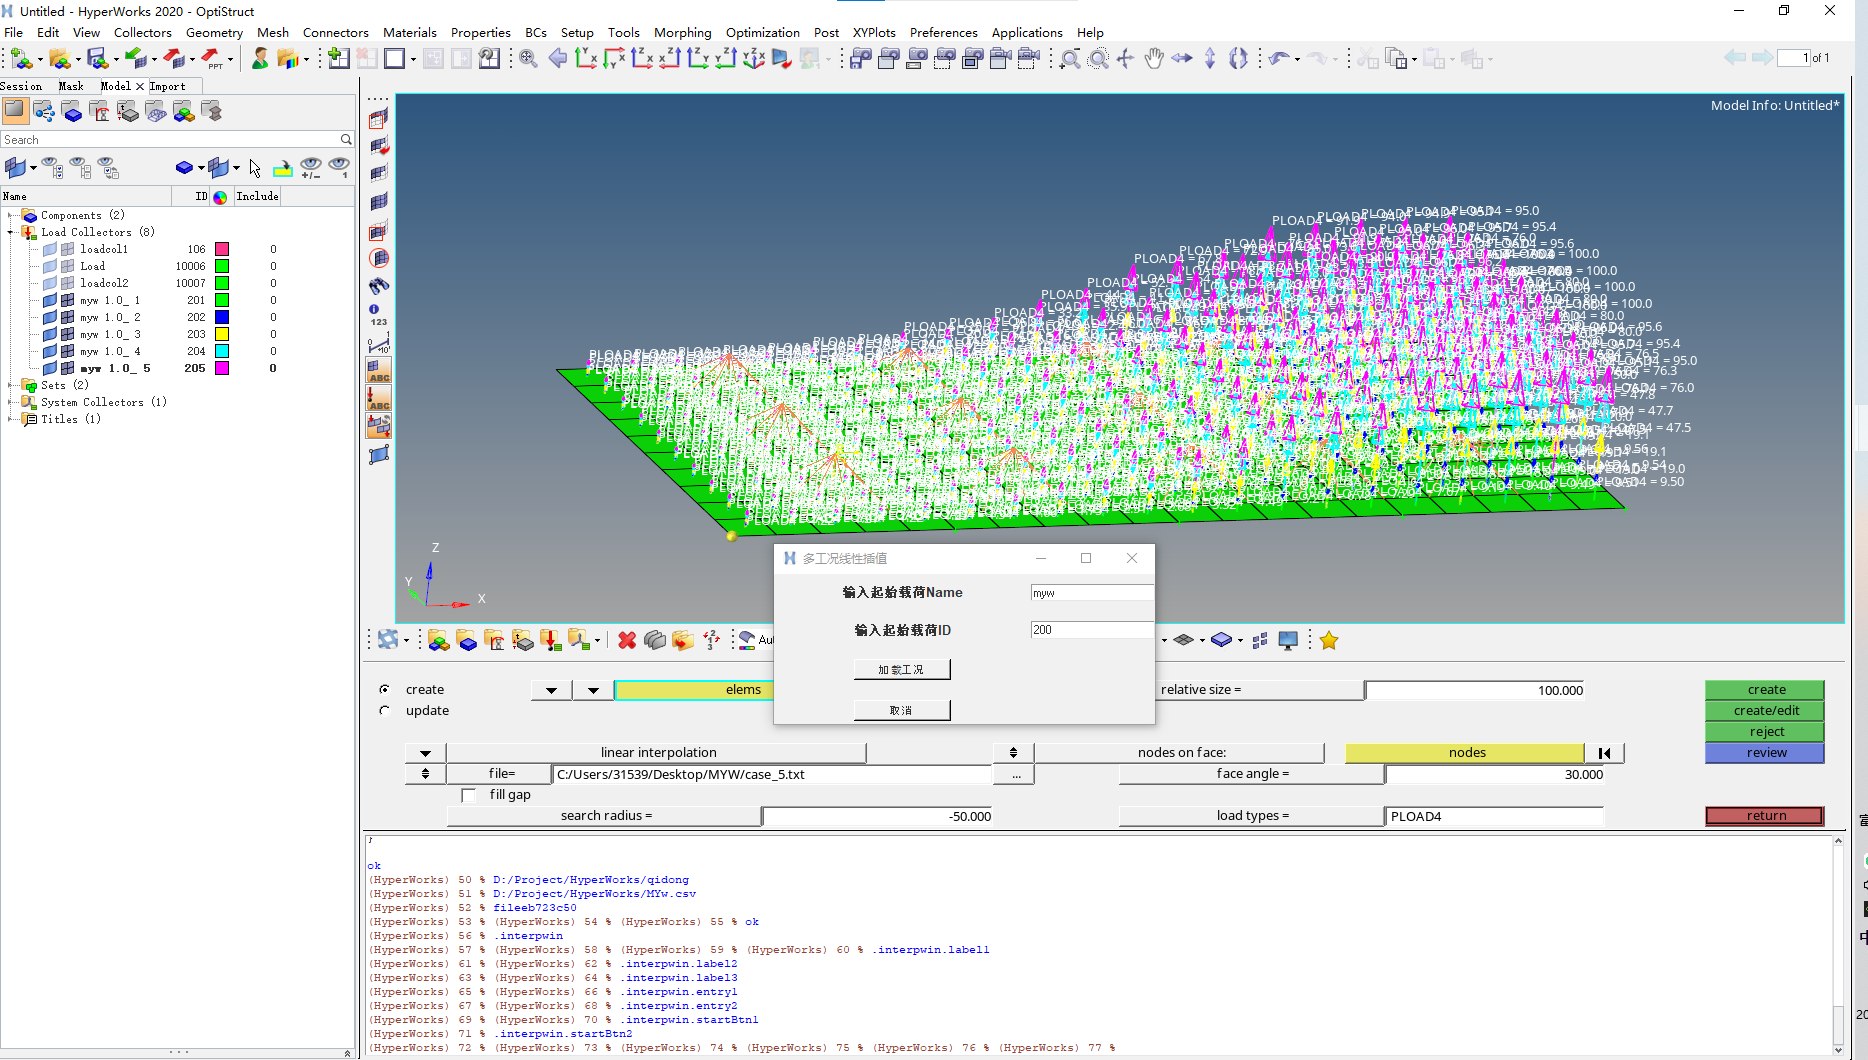
根据数据分列及气动加载两部分代码,设计tk页面。
#创建插值窗口toplevel .interpwinwm title .interpwin "多工况线性插值"wm geometry .interpwin 600x150+1200+800wm attributes .interpwin -topmost 1# 创建标签label .interpwin.label1 -text "请完成载荷检查后,点击\"加载工况\"" -font {Arial 10 bold}grid .interpwin.label1 -row 0 -column 0 -padx 60 -pady 10 -sticky "nsew"label .interpwin.label2 -text "输入起始载荷Name" -font {Arial 10 bold}grid .interpwin.label2 -row 1 -column 0label .interpwin.label3 -text "输入起始载荷ID" -font {Arial 10 bold}grid .interpwin.label3 -row 2 -column 0 -padx 60 -pady 10
#创建entryentry .interpwin.entry1 -textvariable loadstepName -width 20grid .interpwin.entry1 -row 1 -column 1 -padx 0 -pady 10 -sticky "nsew"entry .interpwin.entry2 -textvariable loadstepFirstID -width 20grid .interpwin.entry2 -row 2 -column 1 -padx 0 -pady 10 -sticky "nsew"
# 创建按钮button .interpwin.startBtn1 -text "加载工况" -command {start_interpolation $loadstepName $loadstepFirstID}button .interpwin.startBtn2 -text "取消" -command {destroy .interpwin}# 布局按钮grid .interpwin.startBtn1 -row 3 -column 0 -padx 80 -pady 10 -sticky "nsew"grid .interpwin.startBtn2 -row 4 -column 0 -padx 80 -pady 10 -sticky "nsew"#设置列宽度自适应grid columnconfigure .interpwin 0 -weight 1grid rowconfigure .interpwin 0 -weight 15.加载结果
准备好加载文件,修改加载element集合及法向方向,加载结果如下。
基于Hypermesh平台批量添加线性插值气动工况